Your cart is empty!
Vik Events Official Documentation

Version: 1.11.2
Categories, Items, Events, Classes
Categories
The Categories can group events into one view, generating a list containing only certain events.
By creating a new Joomla Menu Item of type VikEvents - Events List, it is possible to choose a Category filter for that View so that only the events assigned to that Category will be displayed.
Such a page would print the name of the Category together with the HTML description and then all the events will be listed below.
The result will be the same as using the Events List view but with the information of the Category.
Events, Classes, Items
From this task you can manage all the events, classes and anything that can be reserved from your website.
Title - The title of the Event.
Published - The Events can have an unpublished status and they will not be visible in the front site.
Image 1 - The main image of the Event. Used in the events list and in the tickets template files.
Image 2 - The flyer of the Event. Used in the event details page.
Group View Image - The image displayed in the Group View page.
Small Description - A text displayed in the events list page.
Description - The extended html description displayed in the event details page.
Begin Date - The date when the event starts. It must be <= the End Date. It can be a date in the past only if the Allow Day Selection is enabled.
End Date - The date when the event ends. It cannot be in the past but it can be equal to the Reservations End Date.
Reservations End Date - After this date the reservations will no longer be accepted. If empty, the system will set it to the same date as the End Date.
Allow Day Selection - By clicking on the checkbox the system will load a multiple select of the days that go from the Begin Date to the End Date. From that drop down menu you can select one or more days (by holding Ctrl or cmd) when the event will not take place. In case the days difference between the Begin and End Date is greater than 7 days, another drop down menu will be displayed to de-select some week days on which the event doesn't take place. If this setting is enabled the users will be forced to select the day when they want to participate to the event. This feature was made for events with multiple dates.
This function should be used if you would like the users to be able to book a date in the future, not only the very next available date.
Events with Multiple Dates should use this function and the result will be of just one event ID, something different from how the Repetition would work.
Multiple Sessions - If this setting is enabled it will be possible to create multiple Sessions that run on the same day. The sessions have their own availability.
Repetition - If enabled, the event will be repeated after the End Date expires. There are 3 types of repetitions, Daily, Weekly and Monthly. Each one of these types has an Interval, a Maximum Number of Repetitions and a Repeat Until Date. The system only needs one parameter as limit so choose if putting a Maximum Number of Repetitions or a Repeat Until Date, you do not need to use both. The Interval is the step-unit that the system has to use for calculating the next date for the repetition. For example, Weekly Repetition with Interval 2 means that the event must be repeated every 2 weeks.
The Monthly Repetition accepts a sequence of the days of the month when the event should be repeated, separated by comma or the Day of the Month calculated with the the day of the week and the week number. Every second Friday of the month, for example.
Events will be renewed (repeated) only once the End Date will be expired and a new ID will be generated. The expired event will be archived and it will no longer be displayed in the front-end unless you choose to do so with the View Timeline or Events List.
Location - The name of the location where the event will take place, shown in the events list and the details page. If a latitude and a longitude is provided, the location name will become a link that opens a Google Map in a modal box with the marker placed on the location coordinates. The latitude and the longitude of a place can be easily retrieved from Google Maps, type your location in the search box and then right-click on the marker placed in the map by Google. "What's here" will tell you the latitude and the longitude coordinates separated by a comma.
Max Reservations - The maximum number of reservations allowed. If empty the event will have no limits.
Price - The price of the event. If empty it will be set to 0.00 and the event will be free. Please notice that if the event is not free and there are Multiple Prices, this field will be converted into "Starting From Price" and it should never be left empty or the event will be considered as free. In case of Multiple Prices this price will be "ignored" but it should be higher than 0.00. It tells the system wether the event is free of charge or not.
Multiple Prices - If enabled a tool for adding/editing the prices will be shown. An Event with Multiple Prices will let the users choose the desired solution for the ticket prices. Each Multiple Price has a name that can be the type of the ticket, a price, an optional description and eventually the Early Bird feature can be added to adjust a price by a certain date selectable with a calendar. After that date the new price will be applied. It's required to put an After Price if the Early Bird feature is enabled. It is also possible to define a custom number of available tickets for each multiple price. If the field # Available is left empty, the system will automatically calculate the availability of the tickets from the field Max Reservations.
Categories - It's important to assing the Event to one or more categories if you are using some menu items of type VikEvents Category.
Seating Charts - The event can be assigned to one or more Seating Charts. In case the event has only one Seating Chart assigned, the user will be able to select the seats right after the Number of Participants is submitted. Otherwise if there are more than one Seating Charts, the user will have to select the map first.
Parameters - Here you can enable/disable some parameters of the single event. Ask Only Purchaser Info this should always be disabled in case you want the Tickets to contain information about the single participant because if it is enabled the Custom Fields for the Group Members (Participants) will not be shown and the system will only use a placeholder like Guest #1, Guest #2 etc.. for generating the tickets.
Each event can have different Custom Fields by selecting a different Group. Refer to the Custom Fields section for more details.
Tickets Template it is possible to use different HTML templates for generating the tickets in email format or in PDF format. The default template file is called "tmpl_ticket.php" and that will be loaded for generating the tickets in email format, the file pdf_tmpl_ticket.php instead is the default template file for the tickets in PDF format.
You can create your own template file by cloning the default template files and renaming them into something else but respecting the syntax: all the template files must have a name that ends with *tmpl_ticket.php so a valid name for a custom template file for the email format would be "myevent_tmpl_ticket.php", instead a valid name for a custom template file for the PDF format would be "pdf_myevent_tmpl_ticket.php". All these files must be placed in the folder /components/com_vikevents/helpers/ of your server.
Tickets in PDF format these tickets will be placed inside a PDF file that will be attached to an email message sent to the customer and generated through another html template file that you can edit as you wish. It is also possible to include in this message some of the Custom Fields collected during the order confirmation page. The file responsible of the content of this email message is the following: /components/com_vikevents/helpers/client_email_tmpl.php
Seating Charts and Groups
Seating Maps
The seating charts are maps that contain sections and seats.
- Seating Chart/Room Name - The name of the Seating Chart.
- Seating Chart/Room Description - The html description displayed under the seating chart name when the user is selecting the seats.
How to add Sections
Sections - The sections are the Sections - The sections are the seats containers. A section has a Name, a Total Number of Seats and the Number of Seats per Row. With these information the system will draw a section in the page that can be dragged into the desired position of the area. The numbers of the seats always start from 1 but with a double-click on the seat number, you can set a custom value to the seat.seats containers. A section has a Name, a Total Number of Seats and the Number of Seats per Row. With these information the system will draw a section in the page that can be dragged into the desired position of the area. The numbers of the seats always start from 1 but with a double-click on the seat number, you can set a custom value to the seat.

It's important to Drag & Drop and Resize every Section in the map at least once before saving. This way your browser will calculate the right coordinates and sizes of the sections before passing the data to VikEvents.
Sections Rotation
It is possible to apply a rotation in degrees to each section containing the seats. The range of available degrees goes from 1° to 359° because 0 or 360 would not cause any rotation.

In the example above we are applying a rotation of 45° to one section. This function is mobile responsive and it will work on any smartphone or tablet.
Manage Seats Charges
Seats Charges - The seats of each section can have charges that will be applied to the event price or to one or more of the Multiple Prices of the event.
Select a range of seats, click on the first seat and on the last one if these are in sequence.
In the example above we are adding a charge to the seats number 2, 3, 4, 5, 6, 7, 8 of € 20 that will be applied only to the Multiple Price "Premium Ticket" of the event "My Event". We got that select because the event "My Event" has this seating chart assigned to it and it has 2 Multiple Prices. In the example the price for the "Premium Ticket" in the selected seats will be increased by 20, the rest will remain the same.
This is the result in the front site:
Customize Sections
From this task you can add background images to the Seating Chart and to each Section. You can also customize the background colors and the text color of the Sections and the Seats.
Another useful tool of this task is the possibility of resizing manually the height and the width of the sections. This way you will not have to resize the sections from the drawing mode. 
The Background images of the sections are automatically cropped to fit the dimensions of the sections in case the image is bigger than the section width and height.
All the uploads are made through ajax so you can see the result before applying the changes.
This is an example of a customized Seating Chart with a background image and colors for the sections

Seating Maps Groups
Maps with a lot of seats can be grouped into Seating Charts Groups. A group is an HTML Image MAP with click-able areas that link to the single seating charts. This way you can divide all your seats into multiple seating charts.
- Seating Charts Group Name - The name of the Seating Chart Group.
- Seating Charts Room Description - The html description displayed above the Image Map.
Seating Chart Group
By clicking on New Seating Charts Group the first thing that you have to do is uploading an image to use as global map. This image will be divided into smaller portions of seats that will link to the individual seating charts.
Notice that when you are creating a Seating Chart Group, you should have already created the seating charts, at least two.
In the examples below you can see how to make an area of the Map link to one Seating Chart:
By uploading an image to be used as global Map, this is the result:
The screen shot shows 3 areas that are linked to one seating chart each. There can be multiple areas that link to the same seating chart.
There are three types of coordinates that you can use to define the click-able areas of your map:
Options/Extras
The Options are additional services that the users can select and add to their order in the confirmation page. These additional services chosen will be added to the reservation and optionally, listed in the tickets. The Options can also be free and if they aren't then the system will add the calculated cost to the order total.
Options can have a selectable quantity or not, in the first case a text-input field of type number will be displayed so that the users can enter the desired quantity for that Option. In the other case instead, a checkbox will be displayed in the Option box so that users can select the service but not the quantity.
Fields List
- Name - The name of the Option/Extra service displayed in the front site.
- Image - It is possible to upload an image to be used for the Option. The system can re-size the image for you during the upload.
- Description - A text supporting HTML code that will be displayed in the box containing the Option.
- Price - If greater than 0.00 a charge will be considered for this Option.
- Cost per Participant - Whether this Option should multiply the cost per person.
- Selectable Quantity - If enabled, an input field of type number will let the users enter the desired quantity for this Option. A checkbox will be displayed otherwise.
- Max Quantity - The maximum quantity that can be ordered for this Option.
- Events Relations - The events for which this Option is available.
Examples
The screen shot below shows various examples of Options:
Discounts and Memberships
Coupons
The coupon system allows you to create discounts that will be applied to the total order.
Fields List
- code - The coupon code that the users will have to enter in the front end. It can be at most 64 characters long, it can contain any letter, number, symbol. The code should not contain white spaces.
- type - The type can be Permanent or Gift, in the first case the discount will always be applied when this coupon code is used. If the type is gift instead, the coupon can be used only once, after that time it will be removed from the system.
- value - The discount amount to apply expressed in your currency or a percentage value.
Filters
- Items - The coupon can be valid for only some of the current events. If the checkbox All Items is not checked, the list of the current events will be presented with a multiple select.
- Min. Order Total - The minimum amount needed for applying the discount. If not greater than 0.00 the system will ignore this filter.
- Min. People - The minimum number of participants needed for applying the discount. If not greater than 0 the system will ignore this filter.
Memberships/Discounts
A Membership applies discounts automatically to any reservation in accordance to the requirements.
Fields List
- Membership Name - The name of the membership or discount that will be displayed to the users in accordance with it in the front site.
- Percentage of Fixed Value - The discount amount to be applied expressed in your currency or a percentage value. This discount will always be applied at last, after applying any Early Bird option to the types of tickets purchased, after the Charges applied on certain seats and after the coupon code. Only one discount per time can be applied. Memberships are always ignored when creating reservations from the administrator section.
Filters
- Joomla User Group - If this setting is different than -- any -- so not empty, only the logged in users of the front site that belong to the selected Joomla User Group will take benefit of this membership discount.
- Items - The membership can be valid for only some of the current events. If the checkbox All Items is not checked, the list of the current events will be presented with a multiple select.
- Min. number of Registrants - The minimum number of participants needed for applying the membership discount. If not greater than 1 the system will ignore this filter.
Custom Fields
From this task you can manage all the fields that the users will have to fill in before saving the order. During the first installation of VikEvents, some fields are created by the program but it's always possible to manage these fields.
Fields Types
The fields can be of two different types, for the the Group Members or for the Information
- Group Members - fields will be presented to each participant and their role is collecting information about each participant in order to generate the Tickets.
- Billing Information - fields are not used for generating the tickets and they should collect the purchaser information.
Tips
It is possible to assign the Custom Fields to different Groups. This way each event can have different Custom Fields. By default all the existing Custom Fields are assigned to a generic group called Global. Create new ones in case you need to ask for different information to your participants in some events. Use the Global group if the Custom Fields can be the same in every event.
The field Name is the label that will be placed next to the input field. If your website is multilanguage, the label should be a definition inside the .ini language file of each language that you have installed on your Joomla and that you are using. This way you will be able to translate the labels.
For example, the field Address should have a label like ORD_ADDRESS and each .ini file of VikEvents that you have should contain a row like this:
ORD_ADDRESS="Address"
A field can be required or not, in this case the system will check that the user provided something for that information.
If the field type is Text and the setting Is Email is On, that email will be used as recipient for sending the tickets and/or the order email.
If an Email field is asked for each Group Member (Participant), the tickets will be sent individually to those addresses. Otherwise, if the Email address is asked only in the Billing Information, all the tickets will be sent to that address. In case there aren't any fields checked as Is Email, the tickets will not be generated.
Methods of Payment
At the end of the reservation the user will be asked to select one Method of Payment between the ones published from the administrator side. If all of them are unpublished, the order will be set to Confirmed automatically. Events can also have individual payment options. For example the Event A can be assigned to PayPal while the Event B can be assigned to Bank Transfer. You could also have multiple instances of the same payment option and this is useful in case you have multiple PayPal accounts for example. Some events can send the money to one account while some others to another account.
Check the Payments section of our website to see all the available payment gateways. The payment framework can be extended so you could create any integrations with any bank.
Fields List
- Payment Name - The name of the method of payment that the user will see in the front site.
- File Class - The PHP file executed by VikEvents to show and validate the payment.
- Published - Enable or Disable the method of payment.
- Cost - If greater than 0.00 a charge will be added to the total order.
- Auto-Set Order Confirmed - This setting should always be disabled if the method of payment needs to validate an external response from a bank gateway for example. If enabled, after the user selects this method of payment, the order will be set to Confirmed. It's useful for methods of payment like Bank Transfer or similar methods that be done with the same file class (Check, Cash, Pay at the Office etc..).
- Always Show Note - If enabled, the Note text will be displayed also when the order is Confirmed. The notes are always shown if the order status is Pending and if the Note field is not empty
- Note - The html content of the notes to be displayed in the orders page.
Payment Processors
- Bank Transfer, PayPal and Offline Credit Card - are the methods of payment pre-installed in VikEvents but you could create your payment processor for your own bank in case you needed to. All the PHP files for the gateways are located in the following directory of your server: /administrator/components/com_vikevents/payments/
- Bank Transfer - is not a real gateway because it doesn't validate any server response, it's just meant to give the users some information about the payment.
- PayPal - Standard integration with Pay Now button.
- Offline Credit Card - is a payment option which is not linked to any bank gateway so the credit card submitted will not be charged. This payment option is useful for collecting the credit card details and process them offline with your own POS/Terminal. This payment option does not require an SSL certificate on your site because no transactions are made. It is suggested to use one though for a higher PCI-compliance level.
Reservations
All the orders saved are visible from this task. You can also create reservations for the events from this task by clicking on New.
Filters and CSV Export
The list of the orders can be filtered by event and, if the event allows the day selection, it's also possible to filter the reservations by day.
When some filters are applied, on the right of the page you will see a button for exporting a CSV file with the paricipants list:
Note in the image above that the total order of the second row has another value between (), that value is the total amount paid by the user because the event was set for leaving a deposit of 50%.
You can open the exported CSV file with Excel or OpenOffice, in case you have problems formatting the grid in your program, change the settings for displaying the fields that are separated by comma and included in double quotes in case the text contains double quotes. The format is the standard for the Anglo-Saxon countries. Italy, Spain and France separate the values with a semi colon ; so if you live in one of those countries please change the reading settings of your program.
Send messages to all the attendees of an event
After filtering the list of the orders by event and optionally by date, it is possible to send an email message in HTML format to all the participants.
The image below shows how you can compose the email message that will be sent to all the Confirmed registrants of the event. It is possible to specify some additional email address, enter a custom subject for the email and some custom headers for the email like the sender name, sender email address and reply-to address. The message supports HTML code and images.
Reports
By clicking on the Reports tab it is possible to see some reports for the filters given (event, date, session etc..). The screen shot below shows an example of some reports for the reservations of an event:
Invoices
It is possible to generate legal Invoices in PDF format for the Confirmed reservations. The PDF files are generated through a template-file called invoice_tmpl.php that you can find in the directory /components/com_vikevents/helpers/invoices/. The template-file can be customized with any HTML and CSS code and it supports some "special tags" that the parsing function will convert to the corresponding values. By opening that PHP file you will find some comments that show all the available special-tags.
Below is an example of how the page for generating the invoices looks like. By clicking on the checkbox next to each reservation-row and then on the Generate Invoices button of the toolbar, this is what the system will display:
All the generated invoices will be saved in the directory /components/com_vikevents/helpers/invoices/generated/. As the screen shot shows, it is possible to enter the auto-incremental Invoice Number, optionally a Number Suffix (to get numbers like 345/WEB), your company legal information and a Tax amount in a percentage value. If the tax rate is higher than 0 then the system will consider all the prices as tax-included and the tax amount will be placed in the PDF document. In case you would like to remove or change any part of the PDF file for the invoices, just edit the template-file.
Global Configuration
These are the global settings of VikEvents.
Fields List
- Admin e-Mail - The eMail address of the administrator. All the notifications, including the orders received, will be sent to this address.
- Account for Payments - This account is used by some methods of payment like PayPal. Some other gateways need more parameters that must be entered directly in the code for security reasons.
- Company Logo - An image used for generating the header of every page of the PDF that contains the tickets.
- Date Format - The date format used in the front site. This format will be applied to the calendar and to the events dates.
- Time Format - Choose between a 12 hours format or 24.
- Currency Symbol - The character that represents you currency. Used every time the system writes a price.
- Currency Name - The name of your currency, used in the text version of the order email and the PDF.
- Currency Paypal Code - A global setting loaded by the payment framework. Some gateways like PayPal need to define the currency.
- Waiting Minutes of Pending Seat - When the users are selecting the seats of the seating charts a Pending status is assigned to the seats selected. This setting locks the seats for a certain number of minutes disabling the selection of the same seats to other users. This value should never be empty or less than 10 minutes.
- Checker-In User eMail - If the email address of the logged-in user that scans the QRcode contained in the tickets is the same as this setting, the participant will be checked-in and the check-in time will be saved in the database. The Check-in time can be read from the CSV file exported or from the reservation details page.
- Require Login - Events with no Seating Charts assigned can skip the login or the registration. Users can compete their orders without being logged in or registered. No matter if this setting is enabled or disabled, events with Seating Charts will always require the login or the registration.
- 1 Reservation per User per Item - If enabled, the users will only be allowed to make one reservation per event.
- Enable Coupons - Enables or Disables the use of the coupons.
- Show Events Availability - The html content of the notes to be displayed in the orders page.
- Load jQuery -Some tasks of VikEvents require the jQuery library in order to work properly. Enable or Disable this setting depending on your template to avoid javascript conflicts.
- Theme -The theme creates an override of the layout of each task of VikEvents in the front end. No themes installed by default.
Texts
- Footer eMail Text - This html text will be placed at the bottom of the order email sent to the address provided by the user in the Billing Information fields or the address of the user account.
- Ticket Heading Text - This html text will be placed at the top of the ticket content sent either by email or with a PDF file.
- Ticket Footer Text - This html text will be placed at the bottom of the ticket content sent either by email or with a PDF file.
- PDF Advertisement Page - If not empty, this html text will be placed on the last page of the PDF file.
How to use images in the Ticket Texts
The above html fields allow you to embed images in the html texts used for generating the Tickets. It's important to use a standard path for the sources of the images to avoid fatal errors or missing images in the PDF or in the emails.
Every img tag should start like this:
<img src="/images/your_image.jpg" .... other attributes of the image tag.
This way VikEvents will correctly encode the images for the email and for the PDF. So if your images are in some other folder, make sure to move them in images/ and eventually adjust the format of the image tags.
FAQ
The Tickets are not being sent
The Tickets are sent only when the order status is Confirmed so if the order status is Pending the tickets will not be sent until the status changes.
The system generates the tickets with the personal information of each participant so make sure that you have some Custom Fields for the Group Members and that your event is not hiding those fields asking only for the Billing Information.
At least one Custom Field should be checked as is eMail in order to retrieve a recipient to send the tickets. If you don't want to ask for an email address to each participant, leave at least one Text Field checked as is eMail for the Billing Information.
How to place images in the tickets
From the Configuration of VikEvents you can write custom html text containing images that will be placed in the Tickets.
If you are getting a blank page after submitting the order is probably because the system could not reach the image source properly.
All the images should be placed in the folder images/ of your server. From the media manager, make sure that the images that you are using are located in that directory or in any subdirectory of images/.
All the html image tags should have the same syntax for defining the source. This is the right syntax:
<img src="/images/your_image.jpg" alt="..." title="..." class="..." style="..." border="..." />
This way the system will be able to locate the images without errors. It is important to keep that order of attributes so that the system can replace the paths correctly.
QR codes and Check-in Function
The QRcode of each ticket contains a link to the orders page in the front end with all the participant details. This ensures that the reservation is valid and authentic.
The Check-in function saves the date and the time of the QRcode scanning. The device that is scanning the QR code should first authenticate with the browser on the website with the credentials of the Joomla user that has the same email address as the one defined in the Configuration of VikEvents. Any mobile device that supports Apps for scanning QR codes has a browser for visiting web pages and that's what you should use to log in onto your website as this special-user which is allowed to scan tickets.
Joomla supports simultaneous logins of the same user on multiple devices so ideally the people scanning the tickets could be unlimited.
The QRcode should be scanned when the user presents the ticket at the entrance. This will ensure you that the ticket has not been used before.
The steps to scan the tickets are the followings:
1. Log in onto your website with the mobile device as the allowed user for scanning tickets. To check if you're logged in, you can try to contact this link: www.yourwebsite.com/?option=com_users (remember to replace "www.yourwebsite.com/" with your personal domain).
2. Use your preferred App to scan the QRcode on the tickets.
3. The App scanning the QR code will read the content and will open the link on your mobile device browser.
4. Done. The system will validate the ticket and register the check-in time in case of success.
Here is a graphical example: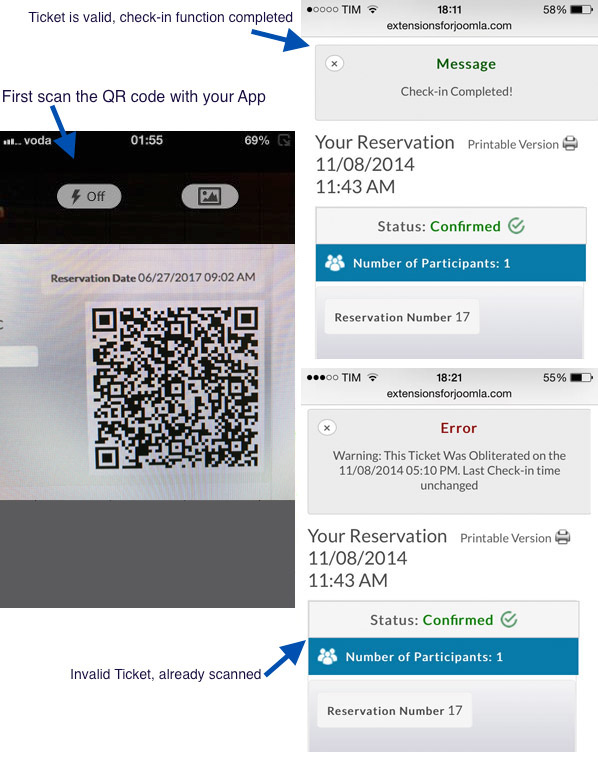
How to create a Group View of Events
Events with the same title but different prices, dates or locations can be grouped into a Group View. From the Items task of the administrator section it is possible to Clone an Item. The Title of the cloned Event will be the same as the original Event.
From the Menus Manager of the administrator section of your Joomla, by creating a new Menu Item, type VikEvents - Single Event, it is possible to create a Group View of Events. Just select one of the Events that is available in other locations or dates with the same Title and then enable the setting Group View.
All the Events with the same Title and the End Reservation Date not expired, will be listed in this Menu Item.
Development
This section explains how to create a custom payment gateway for VikEvents. This technical documentation should be used by those willing to connect the extension with their own bank gateway.
How to develop a payment processor
The payment framework of VikEvents can be extended by creating a PHP file declaring the VikEventsPayment class.
The created file must be placed via FTP onto the directory: /administrator/components/com_vikevents/payments/
In order to develop the class VikEventsPayment please follow the code example below.
<?php

defined('_JEXEC') OR die('Restricted Area');

class VikEventsPayment {

	private $order_info;
	private $params;

	public static function getAdminParameters() {
		return array();
	}

	public function __construct($order, $params=array()) {
		$this->order_info = $order;
		$this->params = $params;
	}

	public function showPayment() {
		/** See the code below to build this method */
	}

	public function validatePayment() {
		/** See the code below to build this method */
		return array();

	}

	public function afterValidation($esit = 0) {
		/** See the code below to build this method */
	}
}
?>
Parameters Building
The parameters form for the administrator section can be built through the getAdminParameters() static method. This is useful to fill in private data or credentials, required for the creation and the validation of the payment/transaction. A Merchant ID and a Signature Key are an example of parameters that should be visible as well as editable in the back-end.
The parameters of the form are returned as an array with the following structure:
[
	"param_1" : [
		"label" : "Label 1",
		"type" 	: "text",
	],
	"param_2" : [
		"label" : "Label 2",
		"type" 	: "select",
	],
]- param_1 - is one key of the array that must be unique (required).
It represents the name of the parameter to use. - label - indicates the text to assign for the parameter in the administrator section (optional).
By placing a double slash (//) after the label, the text after will be displayed as a tip next to the field of the parameter (like "Merchant ID//this is a tip to display..."). - type - is used to render the right type of input field in the administrator section (required).
The values allowed for the type are the followings: custom, select, text. - html - will be used only when the type of the parameter is custom (optional).
- options - is an array containing all the possible values to use in the dropdown (required only when the type is select).
public static function getAdminParameters() {
	$logo_img = JURI::root().'administrator/components/com_vikevents/payments/mypay/mypay-logo.jpg';
	return array(
		'logo' => array(
			'label' => '',
			'type' => 'custom',
			'html' => '<img src="'.$logo_img.'"/>'
		),
		'merchantid' => array(
			'label' => 'Merchant ID',
			'type' => 'text'
		),
		'testmode' => array(
			'label' => 'Test Mode',
			'type' => 'select',
			'options' => array('Yes', 'No'),
		),
	);
}
The code above will generate a parameters form in the administrator section as follows.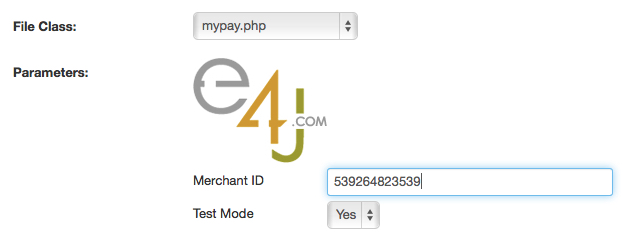
If your form doesn't come up, probably there is a syntax error on your file.
When you fill in the admin form, the parameters are stored in the array $params and you are able to get the values with the instructions below:
$merchant_id = $this->params['merchantid']; /* returns "539264823539" */
$test = $this->params['testmode']; /* returns "Yes" */
Order Info Object
The $order_info object is a mapped key/val array with the order information needed to complete the payment process. You can see below all the available keys of the array.
| Param | Type | Description |
|---|---|---|
| order | array | Array containing sub-parameters for the record of this reservation. |
| custmail | alphanumeric | The email address of the customer. |
| transaction_currency | char(3) | The currency of the amount (3-letter ISO 4217 code). The default is EUR. |
| return_url | string | The return url to come back to your shop from the bank on successful transactions. |
| error_url | string | The error url to come back to your shop from the bank on failed transactions. |
| notify_url | string | The notification url to validate the transaction data sent from the bank. This URL invokes the validatePayment method of your gateway. |
| total_to_pay | decimal | The total amount to pay as decimal (ex. 135.50). |
You can retrieve the information of the $order_info array with the example below.
$uniq_id = $this->order_info['order']['sid']."-".$this->order_info['order']['ts'];Show Payment
The method showPayment() of the object VikEventsPayment is invoked every time a user visits the page of a reservation with PENDING Status. Here you need to echo the HTML form that points to the payment creation url of your bank gateway.
In this method it is also possible to make calls via cURL to retrieve tokens or to self submit the form to receive additional info to send to the bank.
public function showPayment() {

	$merchant_id = $this->params['merchantid'];

	$action_url = "https://yourbankgateway.com/";
	if( $this->params['testmode'] == 'Yes' ) {
		$action_url = "https://test.yourbankgateway.com/";
	}

	$form='<form action="'.$action_url.'" method="post">';
	// put here all the required fields of your gateway
	$form.='<input type="hidden" name="your_post_data_merchantid" value="'.$merchant_id.'"/>';
	$form.='<input type="hidden" name="your_post_data_amount" value="'.$this->order_info['total_to_pay'].'"/>';
	$form.='<input type="hidden" name="your_post_data_notifyurl" value="'.$this->order_info['notify_url'].'"/>';
	$form.='<input type="hidden" name="your_post_data_description" value="'.$this->order_info['transaction_name'].'"/>';
	// print a button to submit the payment form
	$form.='<input type="submit" name="_submit" value="Pay Now!" />';
	$form.='</form>';

	echo $form;

}
Validate Payment
The validatePayment() method is used to validate the transaction details sent from the bank. This method is invoked by the system every time the NotifyURL is visited (the one described in the showPayment() method). Usually the data are sent via POST method, and you can access them by simply using the $_POST super-global variable. Some gateways require a signature validation to make sure the transaction wasn't corrupted. The signature validation can be created only following the instructions on the official documentation of your bank.
This method must return a key/value array with the status of the transaction. The possible keys of the array are the followings.
| Param | Type | Description |
|---|---|---|
| verified | boolean | The status of the transaction. 1/true in case of success, otherwise 0/false. |
| tot_paid | decimal | The real amount paid by the customer, should be returned by the Gateway (ex, 102.75). |
| log | string | A log message sent to the administrator in case of failure. The log can contain any value returned from the Bank and it should be as specific as possible. When not empty, the system will store the logs in the db and they will be visible from the order details page of the back-end. |
Any different values in the returned array will be completely ignored during the validation of the transaction.
public function validatePayment() {
	$array_result = array();
	$array_result['verified'] = 0;
	$array_result['tot_paid'] = ''; /** This value will be stored in the DB */

	/** In case of error the log will be sent via email to the admin */

	$status = $_POST['status'];
	/** Process your gateway response here */
	if($status == 'success') {
		$array_result['verified'] = 1;
		/** Set a value for $array_result['tot_paid'] */
		$array_result['tot_paid'] = $_POST['amount'];
	} else {
		$array_result['log'] = "Transaction Error!\n".$_POST['error_msg'];
	}

	/** Return the array to VikEvents */
	return $array_result;
}
After Validation
The afterValidation($esit) method is generally used to display a message and to redirect the gateway to the order summary view in case of success or failure. Please notice that this method should be in your Class only in case the Bank Gateway will not redirect the user to the ReturnURL. Also, this method, if it exists in the Class, will be invoked by the system after the validatePayment(). The $esit argument is a boolean value that represents the status of the transaction. In case of success (1/true) you should print a positive message and redirect the gateway to the return_url address, otherwise (0/false) you should print an error message and redirect the gateway to the error_url address. Remember also to put an exit or die rule at the end of the method to completely stop the flow.
public function afterValidation($esit = 0) {

	$mainframe = JFactory::getApplication();
	//Build the URL to the order details page
	$redirect_url = 'index.php?option=com_vikevents&task=orders&oid='.$this->order_info['id'].'&scode='.$this->order_info['scode'];

	if($esit < 1) {
		JError::raiseWarning('', 'The payment was not verified, please try again.');
		$mainframe->redirect($redirect_url);
	} else {
		$mainframe->enqueueMessage('Thank you! The payment was verified successfully.');
		$mainframe->redirect($redirect_url);
	}

	exit;
	//
}
You can get HERE the complete code of this example gateway.